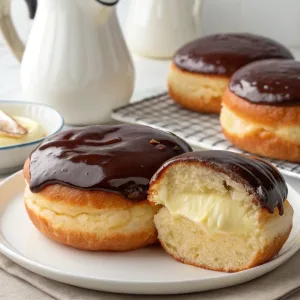
The moment I bit into my first homemade Boston cream doughnut, I knew I had discovered a new favorite treat. The combination of tender, pillowy dough, silky vanilla custard, and glossy chocolate glaze is pure indulgence. The best part? Making these doughnuts at home is not as intimidating as it sounds.
The process is straightforward if you follow the steps, and the result is miles better than store-bought ones. Frying them might sound tricky, but it’s honestly fun once you get the hang of it. Whether you’re serving these for a weekend brunch or just treating yourself, these doughnuts are sure to impress!

Why You’ll Love This Recipe?
These Boston cream doughnuts are the ultimate sweet indulgence. Here’s why you’ll love them as much as I do!
Irresistible Combination of Flavors
The rich vanilla custard and decadent chocolate glaze pair perfectly with the light and airy doughnut shell. Every bite is pure heaven! The balance between creamy and fluffy textures is absolutely spot-on. It’s a treat that satisfies both chocolate and custard lovers alike.
Elevate Your Home Baking Game
Homemade doughnuts sound fancy, but this recipe breaks down the process so anyone can master it. The results are bakery-quality without leaving your kitchen. You don’t need any special tools—just basic kitchen essentials. It’s a great way to impress guests or surprise your family with something special.
Customizable for Any Occasion
You can tweak the flavors and fillings to match your preferences. Think beyond vanilla custard and experiment with other fillings or toppings. Try seasonal options like pumpkin cream or fruity jams for a twist. Decorate with sprinkles, crushed nuts, or drizzle to suit any celebration.
Fresh and Warm Every Time
There’s something magical about biting into a fresh, warm doughnut right after it’s been glazed. Store-bought ones don’t stand a chance! Making them at home means no preservatives—just pure goodness. Serve them straight from the fryer for that melt-in-your-mouth moment.
Perfect for Sharing
These doughnuts are an absolute crowd-pleaser. Make a batch, and watch them disappear at any gathering or celebration. They’re ideal for birthdays, brunches, or casual weekend treats. Doubling the recipe is easy if you’re feeding a larger group.
Cooking Time
- Prep Time: 30 minutes
- Cooking Time: 20 minutes
- Total Time: Approximately 4 hours (including dough rising and chilling time)
Ingredients
Here’s everything you’ll need to bring this recipe to life:
- All-purpose flour
- Instant yeast
- Granulated sugar
- Salt
- Whole milk
- Unsalted butter
- Eggs
- Vanilla extract
- Vegetable oil (for frying)
- Heavy cream
- Semi-sweet chocolate
- Pastry cream (prepared in advance)
Variations
Looking to switch things up? Here are some fun variations to try!
- Custard Twist: Swap the classic vanilla pastry cream for a chocolate or coffee-flavored filling.
- Sugar-Free Glaze: Use a sugar-free chocolate alternative for the glaze to cut down on sweetness.
- Baked Version: Skip the frying and bake the doughnuts for a slightly healthier version.
- Toppings Galore: Garnish with sprinkles, coconut flakes, or even a drizzle of caramel over the chocolate glaze.
Equipment You’ll Need
- Mixing Bowls: For combining ingredients.
- Saucepan: To heat milk and make the chocolate glaze.
- Rolling Pin: To roll out the dough.
- Biscuit Cutter: To cut out perfect doughnut rounds.
- Piping Bag with Round Tip: For filling the doughnuts with custard.
- Candy Thermometer: To monitor the oil temperature during frying.
- Spider Strainer or Slotted Spoon: For removing doughnuts from the oil.
How to Make Boston Cream Doughnuts?
Creating Boston cream doughnuts from scratch is simple when you follow these steps! 🍩
Make the Dough
Combine flour, yeast, sugar, and salt in a large bowl. Heat milk to about 115°F and stir it into the dry ingredients. Add beaten eggs, melted butter, and vanilla, mixing until smooth. Slowly add more flour until the dough is slightly sticky but manageable. Knead it until soft, then place it in a greased bowl to rise for about an hour or until doubled in size.
Shape the Doughnuts
Roll out the risen dough to about ¾-inch thickness on a floured surface. Use a biscuit cutter to cut rounds, placing them on a parchment-lined baking sheet. Cover them with plastic wrap and allow them to rise again until puffy (about 30 minutes).
Fry the Doughnuts
Heat vegetable oil in a saucepan to 350°F. Fry the doughnuts in small batches, cooking them until golden brown on both sides. Remove and place them on a cooling rack to drain off excess oil. Be sure to keep the oil temperature consistent!
Prepare the Glaze
Melt chopped semi-sweet chocolate with heavy cream in a microwave-safe bowl. Stir in 20-second intervals until smooth.
Fill the Doughnuts
Using a small knife, poke an X into the side of each doughnut. Insert a piping bag filled with custard into the hole and gently squeeze to fill. Be generous for that signature Boston cream experience!
Dip and Glaze
Dip the tops of the filled doughnuts into the glossy chocolate glaze. Place them back on the cooling rack to set for a few minutes. Enjoy it while warm or cooled!

Tips for Making the Recipe
These tips make a good recipe great, so keep them in mind while whipping up your doughnuts.
- Temperature Control: Make sure your milk is warm but not hot when combining with yeast. Too hot, and the yeast will die; too cold, and it won’t activate.
- Frying Consistency: Maintain consistent oil temperature by frying in batches and letting the oil heat back up between rounds. Use a candy thermometer for accuracy.
- Smooth Glaze: If your chocolate glaze feels lumpy or grainy, microwave it in short bursts, stirring each time, until it’s perfectly silky.
- Test Your Pastry Cream: Before filling all the doughnuts, test the texture and flavor of your custard in one doughnut to ensure it’s just right.
- Don’t Rush the Rises: Allow the dough to fully double in size during both rises. Properly risen dough results in fluffy, airy doughnuts.
How to Serve Boston Cream Doughnuts
Presentation can elevate your doughnuts into something truly special.
- Classically Simple: Simply serve on a plate, allowing the glossy chocolate glaze to speak for itself.
- Party-Perfect Platter: Arrange them on a tiered dessert tray alongside other treats like cookies or mini cupcakes.
- Extra Garnish: Add a sprinkling of shaved chocolate or a light dusting of powdered sugar over the glaze for added flair.
Serve with coffee or a chilled glass of milk for the ultimate pairing.
Nutritional Information
Each doughnut brings indulgence but moderation is key! Approximate values per doughnut:
- Calories: 409
- Protein: 9g
- Carbohydrates: 52g
- Fat: 18g
Make Ahead and Storage
Boston cream doughnuts are best enjoyed fresh, but you can make and store them with ease.
- Make Ahead
Prepare pastry cream a day or two in advance and store it in the fridge. You can also prepare the dough and refrigerate it overnight, skipping the second rise. - Storage Tips
Store finished doughnuts in an airtight container in the fridge for up to two days. They’re at their best on the same day, but chilling helps preserve freshness. Freezing is not recommended, as the custard filling doesn’t thaw well.
Crafting your own Boston cream doughnuts might take a bit of effort, but the payoff is worth it. There’s nothing quite like biting into one of these freshly made treats! Happy baking! 😊
Boston Cream Doughnuts
Ingredients
- All-purpose flour
- Instant yeast
- Granulated sugar
- Salt
- Whole milk
- Unsalted butter
- Eggs
- Vanilla extract
- Vegetable oil for frying
- Heavy cream
- Semi-sweet chocolate
- Pastry cream prepared in advance
Instructions
- Combine flour, yeast, sugar, and salt in a large bowl. Heat milk to about 115°F and stir it into the dry ingredients. Add beaten eggs, melted butter, and vanilla, mixing until smooth. Slowly add more flour until the dough is slightly sticky but manageable. Knead it until soft, then place it in a greased bowl to rise for about an hour or until doubled in size.
- Roll out the risen dough to about ¾-inch thickness on a floured surface. Use a biscuit cutter to cut rounds, placing them on a parchment-lined baking sheet. Cover them with plastic wrap and allow them to rise again until puffy (about 30 minutes).
- Heat vegetable oil in a saucepan to 350°F. Fry the doughnuts in small batches, cooking them until golden brown on both sides. Remove and place them on a cooling rack to drain off excess oil. Be sure to keep the oil temperature consistent!
- Melt chopped semi-sweet chocolate with heavy cream in a microwave-safe bowl. Stir in 20-second intervals until smooth.
- Using a small knife, poke an X into the side of each doughnut. Insert a piping bag filled with custard into the hole and gently squeeze to fill. Be generous for that signature Boston cream experience!
- Dip the tops of the filled doughnuts into the glossy chocolate glaze. Place them back on the cooling rack to set for a few minutes. Enjoy it while warm or cooled!
Notes
- Temperature Control: Make sure your milk is warm but not hot when combining with yeast. Too hot, and the yeast will die; too cold, and it won’t activate.
- Frying Consistency: Maintain consistent oil temperature by frying in batches and letting the oil heat back up between rounds. Use a candy thermometer for accuracy.
- Smooth Glaze: If your chocolate glaze feels lumpy or grainy, microwave it in short bursts, stirring each time, until it’s perfectly silky.
- Test Your Pastry Cream: Before filling all the doughnuts, test the texture and flavor of your custard in one doughnut to ensure it’s just right.
- Don’t Rush the Rises: Allow the dough to fully double in size during both rises. Properly risen dough results in fluffy, airy doughnuts.