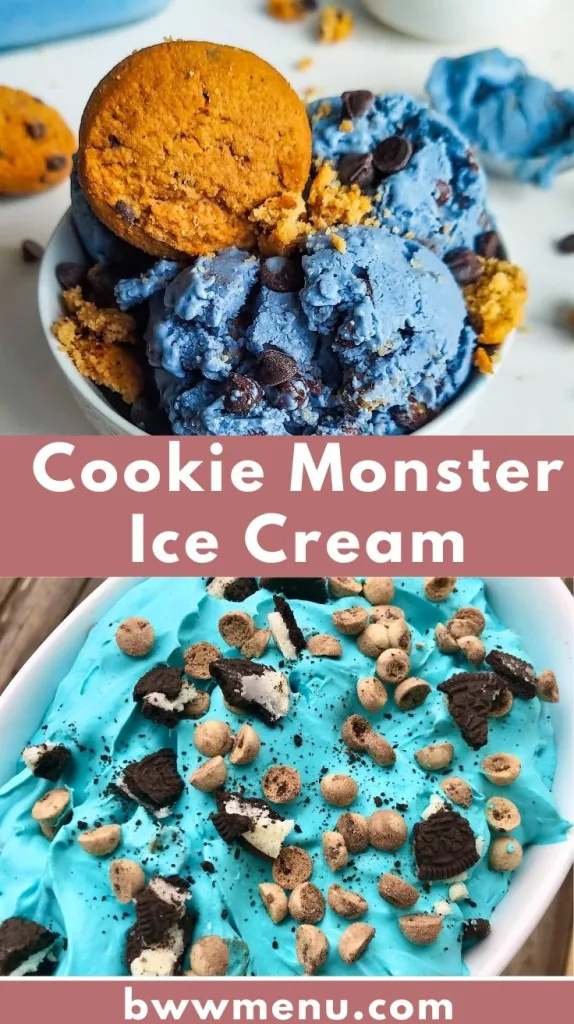
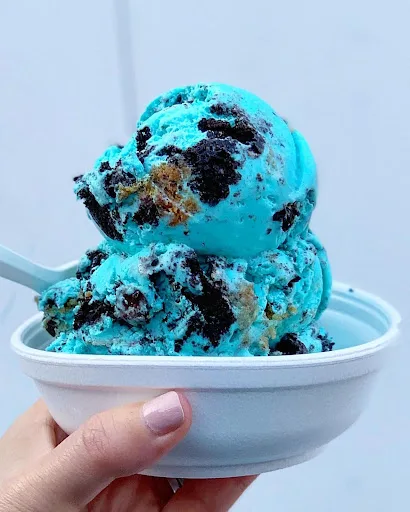
Who doesn’t love a fun and indulgent dessert that brings out the inner child in all of us? Cookie Monster Ice Cream is not only an irresistible treat packed with chunks of cookies and creamy blue sweetness, but it’s also a great way to wow your kids, friends, or guests!
This easy recipe lets you create your own delicious version of this popular frozen delight within the comfort of your kitchen. Whether you’re craving a late-night snack or need a showstopper dessert for a party, this Cookie Monster Ice Cream will leave everyone smiling (and maybe a little blue!).
Cooking Time
Time plays a big role in making this dessert, but don’t worry! It’s simple to manage with the right tips.
- Prep Time: 20 minutes for mixing and assembling ingredients.
- Freezing Time: 4–6 hours or overnight for perfect texture.
- Total Time: Around 6½ hours.
Pro Tip: To save time, prep your cookie chunks and other toppings in advance. You can also use store-bought cookies or pre-chilled ingredients to cut down on prep.
Essential Kitchen Equipment
Before getting started, make sure your kitchen is stocked with these must-have tools. You don’t need a complicated setup; just a few basics and you’re good to go!
- Mixing Bowls (different sizes for efficient prep).
- Whisk or Hand Mixer (perfect for whipping the cream effortlessly).
- Ice Cream Maker (optional but ideal for a creamier result).
- Freezer-Resistant Container (for freezing and storing the ice cream).
- Measuring Cups and Spoons (to get your ratios just right).
- Rubber Spatula (essential for scraping every last bit of deliciousness).
- Blender (if you need to mix everything thoroughly and easily).
Quick Tip: No ice cream maker? Don’t worry! You can still churn the ice cream manually; instructions are provided below.
Ingredients
This Cookie Monster Ice Cream recipe uses simple, easy-to-find ingredients that you probably already have in your pantry. Feel free to experiment or swap them out for healthy ingredients to suit your dietary needs!
- 2 cups heavy whipping cream
- 1 can (14 oz) sweetened condensed milk
- 1 teaspoon vanilla extract
- Blue food coloring
- 1 cup Oreo cookies
- 1 cup chocolate chip cookies
- Optional Add-ins: Marshmallows, cookie dough chunks, or healthier bits like chopped nuts or dark chocolate chips.
Healthy Variation: Swap condensed milk for a plant-based alternative like coconut condensed milk. You can also use sugar-free cookies for a lower-calorie dessert.
How to Make Cookie Monster Ice Cream Recipe?
This vibrant blue cookie ice cream is a fun and delicious homemade treat. With a rich, creamy base and chunks of Oreos and chocolate chip cookies, it’s a dessert everyone will love. Best of all, you don’t need an ice cream maker—just a few simple steps and some patience while it freezes!

Prepare the Base
Start by pouring 2 cups of heavy whipping cream into a large mixing bowl. Using a whisk or an electric hand mixer, beat the cream until soft peaks form. This should take about 3–4 minutes on medium speed. Be careful not to overwhip, as it can turn into butter instead of a fluffy cream base.
Mix the Sweetened Condensed Milk
Once the cream is whipped, gently fold in 1 can (14 ounces) of sweetened condensed milk and 2 teaspoons of vanilla extract. Use a spatula and mix slowly to keep the air in the whipped cream, which helps create a light and creamy texture. Avoid stirring too hard, as this can cause the mixture to become dense.
Add the Fun Color
For that signature blue look, add a few drops of blue food coloring to the mixture. Stir gently until the color is evenly distributed, adjusting the amount until you reach your desired shade. A little goes a long way, so start with a small amount and add more if needed. You can also experiment with different shades by mixing in other colors.
Cookie Time!
Crush about 10 Oreo cookies and ½ cup of chocolate chip cookies into small chunks. Gently fold them into the ice cream mixture, making sure not to overmix so the cookie pieces stay crunchy. If you love extra texture, add some chocolate chips or white chocolate chunks for an even richer flavor.
Transfer and Freeze
Pour the prepared mixture into a freezer-safe container, spreading it evenly with a spatula. To prevent ice crystals from forming, press a layer of plastic wrap directly onto the surface before sealing the container with a lid. Freeze for at least 4–6 hours or overnight until firm.
No Ice Cream Maker? No Problem!
If you don’t have an ice cream maker, simply place the bowl in the freezer and stir the mixture every 30 minutes for about 2–3 hours. This helps incorporate air and prevents ice crystals from forming, resulting in a creamy texture. Once fully frozen, scoop and enjoy your homemade blue cookie ice cream!
Serving Suggestions
Cookie Monster Ice Cream is versatile and fun to serve! Here are a few ideas to make it shine on your dessert table.
- Scoop and Serve in a classic waffle or sugar cone. The vibrant blue color looks amazing!
- Ice Cream Sandwiches by placing scoops between two chocolate chip cookies.
- Toppings Galore like whipped cream, extra cookie crumbs, or chocolate syrup.
- Pair with a Beverage, like cold milk for the kids or coffee for adults.
Want to impress at a party? Top the ice cream with edible googly eyes for the full Cookie Monster look!
Tips for a Better Recipe
Even simple desserts have room for improvement. Here’s how to take your Cookie Monster Ice Cream to the next level.
- Balance the Sweetness by using dark chocolate chips or low-sugar cookies.
- Texture is Key – keep the cookie chunks fairly large so they don’t disappear in the mix.
- Go Natural – opt for natural blue food coloring if you’re concerned about artificial dyes.
- Experiment with Flavors – incorporate caramel or mint extract for a twist!
- Include the Kids – this recipe is so easy that even little ones can help crush cookies or stir the mixture.
Nutritional Information
Here’s a quick snapshot of the nutritional breakdown. Keep in mind, the values will vary based on ingredient choices.
- Calories (per ½ cup): ~300 calories
- Fat: 18g
- Protein: 4g
- Sugar: 21g
- Carbohydrates: 35g
Need it healthier? Use reduced-fat cream, sugar-free cookies, or plant-based alternatives to cut calories.
Storage and Leftover Tips
Making a big batch but don’t think you’ll finish it all in one go? No problem! Store your Cookie Monster Ice Cream easily with these tips.
- Freezer Life – Keep in an airtight container in the freezer. It’s best enjoyed within 2 weeks for optimal freshness, though it can last up to a month.
- Prevent Freezer Burn – Always press plastic wrap directly against the ice cream’s surface before sealing the container.
- Thawing Tips – Allow the ice cream to sit at room temperature for 5–10 minutes before serving so it softens just right.
Cookie Monster Ice Cream Recipe
Ingredients
- 2 cups heavy whipping cream the fresher, the better for ultra-creamy results.
- 1 can 14 oz sweetened condensed milk (acts as the perfect base with no egg custard needed).
- 1 teaspoon vanilla extract pure or artificial works.
- Blue food coloring use gel for a vibrant Cookie Monster vibe.
- 1 cup Oreo cookies crushed into bite-sized chunks.
- 1 cup chocolate chip cookies use your favorite brand or homemade.
- Optional Add-ins: Marshmallows cookie dough chunks, or healthier bits like chopped nuts or dark chocolate chips.
Instructions
- Start by pouring 2 cups of heavy whipping cream into a large mixing bowl. Using a whisk or an electric hand mixer, beat the cream until soft peaks form. This should take about 3–4 minutes on medium speed. Be careful not to overwhip, as it can turn into butter instead of a fluffy cream base.
- Once the cream is whipped, gently fold in 1 can (14 ounces) of sweetened condensed milk and 2 teaspoons of vanilla extract. Use a spatula and mix slowly to keep the air in the whipped cream, which helps create a light and creamy texture. Avoid stirring too hard, as this can cause the mixture to become dense.
- For that signature blue look, add a few drops of blue food coloring to the mixture. Stir gently until the color is evenly distributed, adjusting the amount until you reach your desired shade. A little goes a long way, so start with a small amount and add more if needed. You can also experiment with different shades by mixing in other colors.
- Crush about 10 Oreo cookies and ½ cup of chocolate chip cookies into small chunks. Gently fold them into the ice cream mixture, making sure not to overmix so the cookie pieces stay crunchy. If you love extra texture, add some chocolate chips or white chocolate chunks for an even richer flavor.
- Pour the prepared mixture into a freezer-safe container, spreading it evenly with a spatula. To prevent ice crystals from forming, press a layer of plastic wrap directly onto the surface before sealing the container with a lid. Freeze for at least 4–6 hours or overnight until firm.
- If you don’t have an ice cream maker, simply place the bowl in the freezer and stir the mixture every 30 minutes for about 2–3 hours. This helps incorporate air and prevents ice crystals from forming, resulting in a creamy texture. Once fully frozen, scoop and enjoy your homemade blue cookie ice cream!
Notes
- Freezer Life – Keep in an airtight container in the freezer. It’s best enjoyed within 2 weeks for optimal freshness, though it can last up to a month.
- Prevent Freezer Burn – Always press plastic wrap directly against the ice cream’s surface before sealing the container.
- Thawing Tips – Allow the ice cream to sit at room temperature for 5–10 minutes before serving so it softens just right.