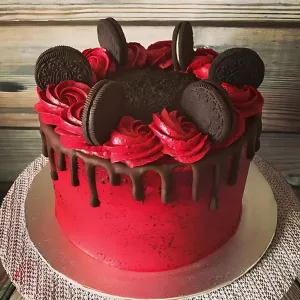
When I first tried this Red Velvet Oreo Cake Recipe, I could hardly wait to share it with everyone. It’s the kind of dessert that immediately wows you—not just with its appearance but every decadent bite.
The smooth and tangy cream cheese frosting combined with the crunch of the Oreo filling is a match made in cake heaven. This cake isn’t complicated to make, but the flavors make it feel like something extra special.
Trust me, once you take a forkful of this masterpiece, you’ll know it’s a keeper that’s perfect for celebrations or spontaneous sweet cravings.

Why This Cake Will Win You Over?
Making a cake this good isn’t just about taste; it’s also about the whole experience. Here’s why this recipe is worth trying in your kitchen.
It’s Easy to Assemble
Don’t be intimidated! The steps are straightforward, and there’s room for creativity when it comes to presentation. From layering to spreading the frosting, everything flows easily, even for beginners.
Packed with Irresistible Flavors
Red velvet brings that subtle cocoa richness, while the Oreos add texture and creaminess. When combined, every bite gives you a heavenly fusion that strikes a perfect balance between sweet and tangy.
Perfect For Any Occasion
Whether it’s a birthday, an anniversary, or just a Tuesday, this cake effortlessly suits any occasion. Fancy or casual, it doesn’t matter; it’s a dessert that’s always a hit.
Customizable to Your Needs
Swap out ingredients for dietary preferences or adjust flavors to suit your taste. From sugar-free to extra indulgent, you’ll love how versatile it is for any crowd.
Guaranteed to Impress
Want “oohs and aahs” before people even take a bite? The vibrant red cake layers, contrasted with the white frosting and Oreo garnish, make this cake look as good as it tastes.
Cooking Breakdown at a Glance
Here’s how long you’ll need to whip up this delicious dessert.
- Prep Time: 25 minutes
- Bake Time: 30 minutes
- Total Time: 1 hour, including cooling time
Must-Have Ingredients
Here’s everything you need to bring your Red Velvet Oreo Cake to life.
- All-purpose flour
- Cocoa powder
- Buttermilk
- Red food coloring
- Butter
- Sugar
- Eggs
- Vanilla extract
- Oreo cookies
- Heavy cream
- Cream cheese

Creative Swaps and Handy Tools
Don’t have all the ingredients, or want to cater to specific dietary needs? No problem! Here are some variations and the essential equipment.
Ingredient Alternatives
- Use gluten-free flour to make the cake gluten-friendly.
- Swap out heavy cream with a dairy-free option if needed.
- Cut down on sugar by using a natural sweetener like stevia.
- Add a personal touch with sprinkles, chocolate chips, or caramel drizzle.
Kitchen Tools You’ll Need
- Mixing Bowls: For combining ingredients.
- Electric Mixer: To cream butter and sugar for a smooth batter.
- Cake Pans: To bake the perfect layers.
- Spatula: For frosting and spreading filling evenly.
- Cooling Rack: To ensure the cakes cool evenly before assembly.
Step-By-Step Guide to Deliciousness
Here’s how to create your Red Velvet Oreo Cake, step by step. Get ready to transform your kitchen into a dessert haven!
Begin with the Gorgeous Red Layers
First, preheat your oven and prepare your cake pans by greasing and lining them with parchment paper. Mix all the dry ingredients in one bowl. Beat your butter and sugar together in another bowl until creamy. 🧈 Add eggs one by one, then mix in your vanilla. Alternate adding your dry ingredients and buttermilk to keep the batter smooth and velvety. Don’t forget your food coloring for that signature red hue! Pour it into pans and bake until the layers are fluffy and fragrant.
Prepare the Irresistible Oreo Filling
While your cakes cool, create the filling. 😍 Crush Oreo cookies into fine crumbs, then fold them into a luscious mixture of cream cheese and whipped cream. This creamy, slightly crunchy filling is what takes this cake to the next level.
Build That Stunning Cake
Place one cake layer on your plate or stand, and spread a generous layer of Oreo filling on top. Add the second layer of cake and repeat the process. You’ll end up with a cake that’s not only tall and beautiful but filled with the surprise of Oreo goodness. 🎂
Frost It to Perfection
Whip up a batch of cream cheese frosting to give your cake a tangy finish. Spread it smoothly over the top and sides of your cake. The frosting ties all the flavors together for that perfect sweet balance.
Time for the Final Touch
Finish with crushed Oreos sprinkled on top, chocolate shavings, or even a drizzle of ganache for an elegant presentation. 🍫 Your masterpiece is ready to shine on any dessert table!
Foolproof Tips for Success
- Cool Completely: Don’t rush; wait until your cake layers are completely cool before layering or frosting.
- Room Temp Matters: Room-temperature ingredients, like butter and cream cheese, make mixing easier and smoother.
- Garnish Fresh: Add garnishes just before serving for the best look and taste.
Serving Ideas for Your Culinary Gem
This cake is as versatile in serving as it is flavorful. Slice generously and layer each slice on a dessert plate alongside a dollop of whipped cream. Sprinkle Oreo crumbs or add fresh berries for a little extra flair. Want a truly luxurious moment? Pair each slice with a scoop of vanilla ice cream. 🍦
Quick Peek at the Nutritional Profile
Here’s a glimpse of what’s in each irresistible slice (values per serving).
- Calories: 450
- Protein: 6g
- Carbohydrates: 58g
- Fat: 19g
Make It Ahead and Store It Right
Making this cake ahead of time? Great idea! The flavors actually deepen when it rests, making it even yummier.
Once fully assembled, cover the cake tightly and store it in the refrigerator for up to three days. If needed, you can freeze the layers (unfrosted) for up to a month. Just thaw them overnight, frost, and add garnishes when you’re ready to serve. 💡
Now that you have the recipe, tips, and tricks, it’s time to get baking. Whether you’re cooking for friends, family, or just yourself, this Red Velvet Oreo Cake is sure to be a massive hit!
For more details, watch this YouTube video:
Red Velvet Oreo Cake Recipe
Ingredients
- All-purpose flour
- Cocoa powder
- Buttermilk
- Red food coloring
- Butter
- Sugar
- Eggs
- Vanilla extract
- Oreo cookies
- Heavy cream
- Cream cheese
Instructions
- While your cakes cool, create the filling. 😍 Crush Oreo cookies into fine crumbs, then fold them into a luscious mixture of cream cheese and whipped cream. This creamy, slightly crunchy filling is what takes this cake to the next level.
- Place one cake layer on your plate or stand, and spread a generous layer of Oreo filling on top. Add the second layer of cake and repeat the process. You’ll end up with a cake that’s not only tall and beautiful but filled with the surprise of Oreo goodness. 🎂
- Whip up a batch of cream cheese frosting to give your cake a tangy finish. Spread it smoothly over the top and sides of your cake. The frosting ties all the flavors together for that perfect sweet balance.
- Finish with crushed Oreos sprinkled on top, chocolate shavings, or even a drizzle of ganache for an elegant presentation. 🍫 Your masterpiece is ready to shine on any dessert table!
Notes
- Cool Completely: Don’t rush; wait until your cake layers are completely cool before layering or frosting.
- Room Temp Matters: Room-temperature ingredients, like butter and cream cheese, make mixing easier and smoother.
- Garnish Fresh: Add garnishes just before serving for the best look and taste.