Strawberry Cheesecake Dessert Cups — Step-by-Step Recipe
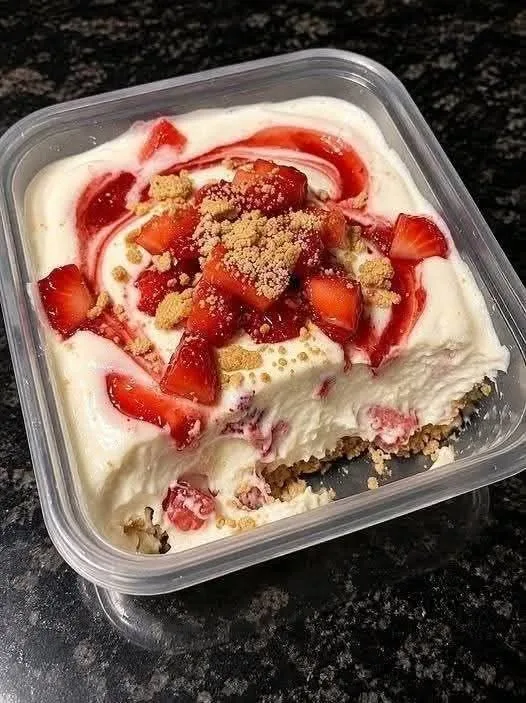
This creamy strawberry dessert is inspired by the image: layers of rich cheesecake-style cream, fresh strawberries, strawberry sauce, and buttery biscuit crumbs. It is a no-bake dessert, so it is simple to prepare and especially good when you want something impressive without turning on the oven.
The finished dessert has three main textures: a crunchy biscuit base, a smooth and creamy cheesecake layer, and juicy strawberries with a sweet strawberry swirl. You can prepare it in one large container, as shown in the image, or divide it into individual dessert cups.
Ingredients
For the biscuit base
- 2 cups digestive biscuits or graham crackers, finely crushed
- 5 tablespoons unsalted butter, melted
- 2 tablespoons granulated sugar, optional
- A small pinch of salt
For the cheesecake cream
- 8 ounces (225 g) cream cheese, softened
- ½ cup powdered sugar
- 1 teaspoon vanilla extract
- 1 cup heavy whipping cream, cold
- 2 tablespoons powdered sugar for whipping the cream
For the strawberry layer
- 2 cups fresh strawberries
- 3 tablespoons granulated sugar
- 1 teaspoon lemon juice
- 1 teaspoon cornstarch
- 1 tablespoon water
For decoration
- 1 cup fresh strawberries, chopped
- ¼ cup crushed biscuits
- Extra strawberry sauce
- A few whole or sliced strawberries
Step 1: Prepare the Biscuit Crumbs
Begin by preparing the crunchy base. Place the digestive biscuits or graham crackers into a food processor and pulse until they become fine crumbs.
If you do not have a food processor, place the biscuits in a sealed plastic bag and crush them with a rolling pin. The crumbs should be mostly fine, although a few slightly larger pieces will give the dessert a pleasant texture.
Transfer the crumbs to a bowl and add the melted butter. Add the optional sugar and a small pinch of salt. Mix everything thoroughly until the crumbs resemble damp sand.
The melted butter is important because it helps the crumbs hold together once chilled.
Step 2: Make the Strawberry Sauce
Wash and remove the green tops from approximately 2 cups of strawberries. Chop them into small pieces.
Place the chopped strawberries in a small saucepan with the granulated sugar and lemon juice. Cook over medium heat for about 5–7 minutes, stirring occasionally.
As the strawberries heat, they will release their natural juices and begin to soften.
Mix the cornstarch with 1 tablespoon of water in a small bowl until smooth. Pour this mixture into the saucepan and stir continuously.
Cook for another 1–2 minutes until the strawberry mixture becomes slightly thicker and glossy.
Remove the saucepan from the heat and allow the sauce to cool completely.
For a smoother sauce, you can blend the cooked strawberries before cooling them. For a more rustic dessert like the one pictured, leave some small strawberry pieces in the sauce.
Step 3: Prepare the Cheesecake Filling
Make sure the cream cheese is softened to room temperature. This helps prevent lumps.
Place the cream cheese in a large mixing bowl and beat it until smooth and creamy.
Add ½ cup of powdered sugar and the vanilla extract. Continue beating until everything is well combined.
In a separate bowl, pour in the cold heavy whipping cream. Add 2 tablespoons of powdered sugar and whip using an electric mixer until stiff peaks form.
Be careful not to overwhip the cream. Once it becomes thick and holds its shape, stop mixing.
Now gently fold the whipped cream into the cream cheese mixture using a spatula. Fold slowly rather than vigorously because you want to keep the filling light and fluffy.
The finished mixture should be thick, smooth, creamy, and easy to spread.
Step 4: Prepare the Fresh Strawberries
Wash approximately 1 cup of fresh strawberries and dry them thoroughly.
Remove the stems and cut the strawberries into small chunks or thin slices.
Try to keep several attractive pieces for the top of the dessert. The image shows strawberries in a variety of sizes, which gives the finished dessert a homemade and abundant appearance.
If your strawberries are particularly tart, toss them with a teaspoon or two of sugar and let them sit for about 5 minutes.
Step 5: Assemble the Biscuit Layer
Take a clear square container, serving dish, or individual dessert cups.
Spread the biscuit mixture across the bottom. Use the back of a spoon to gently press the crumbs into an even layer.
You do not need to compact them extremely firmly. A slightly loose biscuit layer will give you the crumbly texture visible in the photograph.
For individual cups, add approximately 2–3 tablespoons of crumbs to each serving.
Step 6: Add the Cheesecake Cream
Spoon a generous layer of the cheesecake mixture over the biscuit base.
Spread it gently with a spatula or the back of a spoon.
Try to create an even layer, but do not worry if the surface has a few natural swirls or ridges. The dessert in the image has a wonderfully homemade appearance rather than a perfectly smooth, professionally decorated surface.
If you want particularly neat layers, transfer the cheesecake mixture into a piping bag and pipe it into the container.
Step 7: Add the Strawberry Sauce
Drizzle several spoonfuls of cooled strawberry sauce over the cream.
Do not completely cover the white layer. Instead, create streaks and small pools of sauce.
Using a toothpick or the tip of a knife, gently swirl the sauce through the cream.
This creates the beautiful red-and-white marbled appearance visible in the image.
Avoid mixing too much. You want distinct red strawberry ribbons rather than turning the entire cheesecake filling pink.
Step 8: Add Fresh Strawberries
Scatter chopped fresh strawberries over the strawberry sauce.
Arrange some pieces around the center and sides. You can use larger strawberry chunks for a more dramatic appearance.
Press a few pieces very lightly into the cream so they stay in place.
At this stage, the dessert should already look colorful and appetizing, with white cheesecake cream, red strawberries, and pink-red strawberry swirls.
Step 9: Add the Final Biscuit Crumbs
Sprinkle crushed biscuits over the strawberries.
Use a mixture of very fine crumbs and slightly larger pieces. This creates the same textured appearance as the dessert shown in the photograph.
Do not cover every strawberry. Leaving some fruit exposed makes the red color much more noticeable.
You can also sprinkle a few crumbs around the edges for a casual homemade presentation.
Step 10: Chill the Dessert
Cover the container with a lid or plastic wrap and place it in the refrigerator.
Chill for at least 3–4 hours, although overnight is even better.
Chilling allows the cheesecake filling to become firmer and gives the biscuit layer time to absorb a little moisture while remaining pleasantly crumbly.
If you are preparing individual cups, 2–3 hours may be sufficient.
Step 11: Decorate Before Serving
Just before serving, add a few freshly chopped strawberries to the top.
Drizzle a little additional strawberry sauce over the surface and finish with a final sprinkling of biscuit crumbs.
For a presentation similar to the photograph, place several larger strawberry pieces in the center and allow some smaller pieces to scatter naturally around them.
Avoid overdecorating. The combination of strawberries, cream, sauce, and crumbs already creates a beautiful presentation.
Step 12: Serve
Serve the strawberry cheesecake dessert chilled.
When you take the first spoonful, you should get a little of everything: creamy cheesecake filling, juicy strawberry, sweet strawberry sauce, and crunchy buttery biscuit crumbs.
The dessert is rich, so relatively small portions can be very satisfying.
Storage
Keep the dessert refrigerated and consume it within 2–3 days for the best texture and flavor. Fresh strawberries can release liquid over time, so the topping will be freshest on the day it is prepared.
Final Result
The finished dessert should be creamy and thick, with bright strawberry pieces distributed across the top and delicate red strawberry swirls running through the white filling. The golden biscuit crumbs provide both color and crunch, while the biscuit base gives the dessert a cheesecake-like foundation.
The recipe is flexible, too. You can make it sweeter by increasing the sugar, use strawberry jam instead of homemade sauce for convenience, or add a thin layer of white chocolate or strawberry gelatin for a different variation.