Description
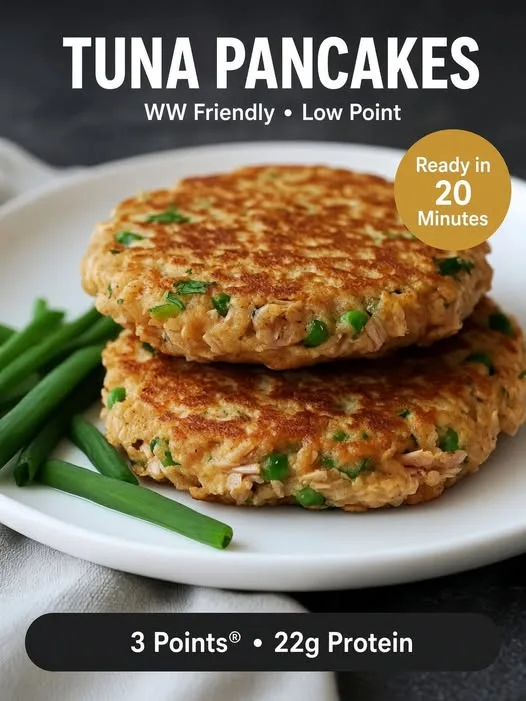
These Crispy High-Protein Tuna Pancakes are a delicious way to turn simple pantry ingredients into a satisfying, protein-packed meal! Made with flaky tuna, eggs, fresh green onions, and flavorful seasonings, they develop beautifully golden, crispy edges while staying tender and moist inside. Every bite delivers savory seafood flavor with a light, fluffy texture that makes them perfect for breakfast, lunch, or a quick dinner. With approximately 22g of protein and just 3 Weight Watchers Points per serving, these tuna pancakes are a fantastic option for anyone looking for an easy, high-protein, low-carb-friendly meal.
Can These Tuna Pancakes Support Weight Loss Goals?
Yes! These tuna pancakes can fit comfortably into a balanced weight-loss eating plan. Tuna is a lean source of protein that helps promote fullness and supports muscle maintenance. Eggs provide additional protein and help bind the pancakes together, while green onions add freshness and flavor without many calories. Using a small amount of flour and cooking spray instead of excessive oil helps keep the overall calorie content controlled. Pair them with a fresh salad or steamed vegetables for a satisfying meal.
Do These Tuna Pancakes Fit a High-Protein Lifestyle?
Absolutely! These pancakes use tuna and eggs as their primary protein sources, providing approximately 22g of protein per serving. A small amount of flour helps hold the mixture together, while green onions and seasonings add flavor without significantly increasing calories. Each serving contains approximately 8–10g net carbohydrates, depending on the flour used. They are suitable for many high-protein eating plans and can also fit moderate low-carb lifestyles. They are not strictly keto-friendly when prepared with regular flour.
Why This Recipe Is Special
- 22g of Protein: Tuna and eggs provide a satisfying combination of high-quality protein.
- Crispy Outside: Pan-cooking creates beautifully golden edges with a delicious crunch.
- Tender Inside: The tuna and egg mixture stays soft and moist when cooked correctly.
- Weight Watchers Friendly: Approximately 3 Points per serving, depending on your ingredients and WW plan.
- Quick and Budget-Friendly: Uses simple pantry ingredients for an easy protein-rich meal.
My Personal Experience
– The Crispy Texture Is Amazing: I love how the edges become golden and slightly crunchy while the center remains tender. It gives these tuna pancakes a satisfying texture in every bite.
– Perfect for Protein Goals: Tuna and eggs make these pancakes naturally protein-rich. They are a convenient way to enjoy seafood without preparing an elaborate meal.
– Green Onions Add Freshness: The green onions bring a mild, savory flavor that complements the tuna beautifully. They also make the pancakes look colorful and appetizing.
– Great for Quick Meals: These pancakes come together with simple ingredients and cook quickly. They are especially useful when I want something filling without spending too much time in the kitchen.
Perfect For
- Quick weekday breakfasts.
- Healthy lunches and dinners.
- High-protein meal prep.
- Weight Watchers meal plans.
- Low-carb-friendly eating routines.
- Post-workout meals.
- Light afternoon snacks.
- Budget-friendly family meals.
- Seafood lovers looking for something different.
Why You’ll Love This Recipe
– Simple Pantry Ingredients: Canned tuna, eggs, green onions, and basic seasonings make preparation easy. You do not need expensive or complicated ingredients.
– Golden and Crispy: Pan-frying creates a delicious golden crust. The inside remains soft and tender rather than dry.
– Protein-Packed: Each serving provides approximately 22g of protein. It is a satisfying alternative to ordinary flour-based pancakes.
– Easy to Customize: Add garlic powder, chili flakes, fresh parsley, or black pepper. You can adjust the seasonings to match your taste.
– Perfect for Meal Prep: Prepare a batch and refrigerate individual portions. They are easy to reheat for convenient lunches throughout the week.
Common Mistakes to Avoid
- Not Draining the Tuna Properly: Excess liquid makes the mixture watery and difficult to shape. Drain the tuna thoroughly before mixing.
- Making the Mixture Too Thin: A runny mixture may spread excessively in the pan. Add a little flour or another suitable binder if needed.
- Cooking Over High Heat: High heat can burn the outside before the center cooks. Use medium heat for even browning.
- Flipping Too Early: Pancakes can break apart if the bottom has not set. Wait until the edges look firm and golden before flipping.
Required Equipment
- Non-Stick Frying Pan — Prevents sticking and helps create evenly browned pancakes.
- Mixing Bowl — Provides enough space to combine tuna, eggs, and seasonings.
- Fork — Makes breaking apart tuna and mixing ingredients easier.
- Whisk — Helps combine eggs evenly.
- Measuring Cups and Spoons — Keep ingredient quantities consistent.
- Flexible Spatula — Makes flipping delicate tuna pancakes easier.
- Paper Towels — Help drain excess liquid from canned tuna.
Storage Instructions
Refrigerator: Allow cooked tuna pancakes to cool slightly before transferring them to an airtight food-safe container. Place parchment paper between layers to prevent sticking. Refrigerate at 40°F (4°C) or below and consume within 3–4 days.
Freezer: Arrange completely cooled pancakes in a single layer on a baking sheet and freeze until firm. Transfer them to a freezer-safe container or zip-lock bag with parchment paper between layers. Freeze for up to 2 months for the best quality.
Reheating: Reheat refrigerated pancakes in a non-stick skillet over medium-low heat for approximately 2–3 minutes per side. Alternatively, use an air fryer at 350°F (175°C) for 3–5 minutes until heated through.
Meal Prep Tip: Divide the pancakes into individual portions before refrigerating or freezing. This makes it easier to prepare quick, protein-rich meals during busy weekdays.
Recipe Details
- Preparation Time: 10 minutes
- Cooking Time: 12–15 minutes
- Total Time: 22–25 minutes
- Servings: 4
- Best Season: All-season
- Total Calories: Approximately 190 calories per serving.
Short Description
These crispy tuna pancakes combine flaky tuna, eggs, and fresh green onions for a delicious savory meal.
Golden and crunchy outside, they stay soft and tender inside while delivering approximately 22g of protein per serving.
An easy, budget-friendly, high-protein recipe with just 3 Weight Watchers Points per serving!
📝 Ingredients
| Ingredient | Quantity |
|---|---|
| Canned tuna in water, drained | 2 cans (10 oz / 280g total drained) |
| Large eggs | 2 |
| All-purpose flour | ¼ cup |
| Green onions | ¼ cup, finely chopped |
| Plain nonfat Greek yogurt | 2 tablespoons |
| Garlic powder | ½ teaspoon |
| Onion powder | ½ teaspoon |
| Black pepper | ¼ teaspoon |
| Salt | ¼ teaspoon, or to taste |
| Lemon juice | 1 tablespoon |
| Fresh parsley | 1 tablespoon, chopped |
| Olive oil cooking spray | As needed |
Ingredient Notes:
- Tuna: Choose tuna packed in water and drain it thoroughly to avoid excess moisture.
- Eggs: Help bind the ingredients and provide additional protein.
- Flour: Creates structure and helps the pancakes hold their shape.
- Greek Yogurt: Adds moisture and tenderness while contributing extra protein.
- Green Onions: Provide a mild onion flavor and fresh color.
- Lemon Juice: Brightens the savory seafood flavor.
- Cooking Spray: Helps create a golden crust without requiring much additional oil.
Directions
Step 1: Prepare the Tuna
Open the canned tuna and drain it thoroughly.
Transfer the tuna to a mixing bowl and break it into small flakes using a fork.
Remove excess liquid to prevent the pancake mixture from becoming watery.
Step 2: Prepare the Egg Mixture
In a separate small bowl, crack the eggs and whisk until the yolks and whites are fully combined.
Add the Greek yogurt and lemon juice.
Whisk for approximately 30 seconds until smooth.
Step 3: Combine the Ingredients
Add the egg mixture to the flaked tuna.
Stir in the chopped green onions, flour, garlic powder, onion powder, black pepper, salt, and parsley.
Mix gently until everything is evenly combined.
The mixture should be moist but thick enough to hold its shape when spooned into the pan.
High-Protein Tip: Keep tuna as the main ingredient rather than adding excessive flour. This helps maintain a higher protein-to-carbohydrate ratio.
Step 4: Shape the Pancakes
Divide the mixture into approximately 8 equal portions.
Use a spoon to place each portion onto a plate or tray.
Gently flatten each portion into a small pancake approximately ½ inch thick.
Avoid pressing too firmly because this can make the pancakes dense.
Step 5: Heat the Pan
Place a non-stick frying pan over medium heat.
Allow it to warm for approximately 2 minutes.
Lightly coat the surface with olive oil cooking spray.
The pan should be hot enough to create a gentle sizzle when the tuna mixture touches it.
Step 6: Cook Until Golden
Place the pancakes into the pan in batches, leaving enough space between them.
Cook for approximately 3–4 minutes on the first side.
Look for golden-brown edges and a firm bottom before flipping.
Carefully turn each pancake using a flexible spatula.
Cook the other side for another 3–4 minutes until golden and fully set.
Step 7: Check the Texture
The finished pancakes should have crispy golden edges and a tender, moist center.
Because the mixture contains eggs, make sure they are fully cooked through.
Avoid using excessively high heat, which can brown the outside too quickly.
Step 8: Serve and Enjoy
Transfer the cooked pancakes to a serving plate.
Garnish with extra chopped green onions and fresh parsley.
Serve warm with lemon wedges, Greek yogurt dip, or a fresh cucumber salad.
Nutrition Facts (Per Serving – Approximate)
Based on ¼ of the complete recipe, assuming tuna packed in water and minimal cooking spray. Actual values depend on tuna brands and portion sizes.
| Nutrient | Amount |
|---|---|
| Calories | 190 kcal |
| Total Fat | 5g |
| Cholesterol | 115mg |
| Sodium | 480mg |
| Potassium | 380mg |
| Total Carbohydrates | 9g |
| Fiber | 1g |
| Net Carbs | 8g |
| Sugars | 2g |
| Protein | 22g |
| Calcium | 55mg |
Notes
- Storage: Refrigerate cooked pancakes in airtight containers for up to 3–4 days.
- Freezing: Freeze individual pancakes with parchment paper between layers for up to 2 months.
- Reheating: Use an air fryer or non-stick skillet to bring back some of the crispy texture.
- Allergy Information: Contains fish, eggs, dairy, and wheat.
- Gluten-Free Option: Replace all-purpose flour with certified gluten-free oat flour or chickpea flour.
- Flavor Boost: Add smoked paprika, chili flakes, Dijon mustard, or extra lemon zest.
- Serving Suggestion: Pair with cucumber salad, steamed broccoli, or a Greek yogurt garlic dip.
- Texture Tip: Always drain tuna thoroughly and avoid adding too much liquid.
- WW Points: The 3 Points estimate depends on the specific Weight Watchers plan, ingredient brands, cooking spray, and serving size; verify the total in your WW tracker.
- Mercury Note: Tuna contains mercury, so vary seafood choices and follow recommended tuna consumption guidance, particularly during pregnancy.
Frequently Asked Questions
1. Are tuna pancakes good for weight loss?
Yes, they can fit into a balanced weight-loss eating plan because tuna and eggs provide protein while the recipe uses relatively little added oil.
2. How much protein is in each serving?
Each serving contains approximately 22g of protein, depending on the tuna brand and portion size.
3. Can I make tuna pancakes without flour?
Yes, you can replace the flour with chickpea flour or finely ground oats, although the texture and nutritional values will change.
4. Can I bake these tuna pancakes instead of frying them?
Yes, arrange them on a parchment-lined baking tray and bake at 400°F (200°C) for approximately 15–20 minutes, flipping halfway through.
5. Can I prepare tuna pancakes ahead of time?
Yes, prepare the mixture and refrigerate it covered for up to 24 hours before cooking.
6. What is the best sauce to serve with tuna pancakes?
Garlic Greek yogurt sauce, lemon yogurt dressing, or a light spicy mayo makes an excellent accompaniment.