Description
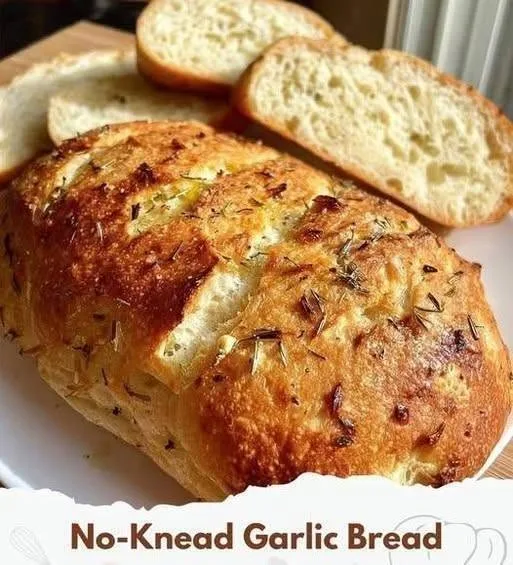
This Diabetic No-Knead Garlic Bread is a comforting homemade recipe with a golden, lightly crispy crust and a soft, fluffy center infused with delicious garlic and herbs. Inspired by a traditional family recipe, it offers the familiar taste of homemade garlic bread without the effort of kneading. With a few ingredient adjustments, it can be made lower in carbohydrates and more suitable for people watching their sugar intake. Pair it with a protein-rich meal for a satisfying addition to your menu.
Can This Diabetic No-Knead Garlic Bread Support Weight Loss Goals?
This bread can fit into a balanced weight-loss eating plan when enjoyed in controlled portions. Using whole-wheat flour and adding Greek yogurt provides some fiber and protein, which can make it more satisfying than conventional white garlic bread. However, bread is still a source of carbohydrates, so portion size matters. Pairing one slice with grilled chicken, eggs, or another lean protein can help create a more balanced meal.
Does This Recipe Fit a High-Protein Lifestyle?
This garlic bread provides a modest amount of protein from whole-wheat flour and Greek yogurt. It is not naturally a high-protein or keto-friendly recipe, but Greek yogurt and optional unflavored protein-rich ingredients can improve its protein content. Its estimated net carbs are approximately 18g per slice, depending on the flour and serving size. Pairing it with lean meat or a high-protein soup makes it more suitable for a high-protein lifestyle.
Why This Recipe Is Special
- No Kneading Required: A simple mixing method makes homemade bread easier to prepare.
- Garlic Flavor: Fresh garlic and herbs create a delicious savory aroma.
- Family-Inspired: A comforting recipe inspired by traditional homemade cooking.
- Customizable: You can adjust the flour, herbs, and toppings to suit your preferences.
- Protein Pairing Friendly: It works well alongside chicken, eggs, or Greek yogurt dips.
My Personal Experience
- The Garlic Aroma: Fresh garlic gives this bread an irresistible smell while baking. It makes the kitchen feel warm and welcoming.
- The Soft Texture: The inside stays tender while the outside develops a lightly crisp crust. It is especially enjoyable when served warm.
- The Easy Preparation: Since there is no kneading involved, preparation feels simple and manageable. It is a practical option when you want homemade bread without extra effort.
- The Versatility: I enjoy serving it with grilled chicken or vegetable soup. It can easily become part of a satisfying lunch or dinner.
Perfect For
- Weeknight dinners alongside grilled chicken or vegetable soup.
- Family meals when you want freshly baked homemade bread.
- Meal preparation when paired with protein-rich dishes.
- Light lunches with eggs, chicken salad, or Greek yogurt dip.
- People looking for a portion-controlled alternative to traditional garlic bread.
Why You’ll Love This Recipe
- Simple Preparation: Mix the ingredients and allow the dough to rise without kneading. This saves time and reduces preparation effort.
- Rich Garlic Flavor: Garlic, butter, and Italian herbs create a savory topping. Every slice has a delicious homemade taste.
- Soft and Fluffy Center: The dough develops a tender texture when properly proofed. The crust becomes lightly golden after baking.
- Easy to Customize: You can use whole-wheat flour or add seeds for extra fiber. Small ingredient changes can make the recipe more nutritious.
- Great with Protein: Serve it with chicken, eggs, or lean beef. This helps balance the carbohydrates in each serving.
Common Mistakes to Avoid
- Adding Too Much Flour: Extra flour can make the bread dense and dry. Add only enough to create a soft, sticky dough.
- Using Hot Water: Very hot water can damage the yeast. Use lukewarm water instead.
- Skipping the Rising Time: Insufficient proofing can result in heavy bread. Allow the dough to rise until visibly expanded.
- Adding Too Much Garlic Butter: Excessive butter can make the bread greasy and increase its calorie content. Brush on a moderate amount.
Required Equipment
- Large Mixing Bowl — Provides enough room to combine the dough ingredients.
- Measuring Cups and Spoons — Help maintain consistent ingredient quantities.
- Whisk or Wooden Spoon — Makes mixing the sticky dough easier.
- Loaf Pan — Helps the bread maintain its shape while baking.
- Kitchen Towel — Covers the dough during rising.
- Pastry Brush — Spreads garlic butter evenly over the bread.
- Oven — Bakes the bread until golden and cooked through.
Storage Instructions
- Refrigerator: Allow the bread to cool completely, then store it in an airtight container or food-safe bag for up to 3–4 days.
- Freezer: Slice the cooled bread and freeze it in a freezer-safe bag for up to 2 months.
- Reheating: Warm individual slices in an oven at 325°F (165°C) for approximately 5–7 minutes.
- Freshness Tip: Avoid storing warm bread in a sealed container because trapped moisture can make it soggy.
Recipe Details
- Preparation Time: 15 minutes
- Rising Time: 60–90 minutes
- Cooking Time: 25–30 minutes
- Total Time: Approximately 1 hour 45 minutes
- Servings: 12 slices
- Best Season for This Recipe: All-season
- Total Calories (Per Serving): Approximately 145 calories
Short Description
Soft, homemade no-knead garlic bread with a golden crust and delicious garlic-herb flavor.
Made with simple ingredients and a convenient mixing method.
Enjoy one portion alongside a protein-rich meal for a satisfying combination.
📝 Ingredients
For the Bread
- 2 cups (240g) whole-wheat flour
- 1 cup (240ml) warm water
- ½ cup (120g) plain nonfat Greek yogurt
- 2¼ teaspoons (7g) instant yeast
- 1 teaspoon salt
- 1 teaspoon olive oil
- 1 teaspoon granulated sugar (to help activate the yeast)
For the Garlic Topping
- 2 tablespoons (28g) unsalted butter, melted
- 3 cloves garlic, finely minced
- 1 tablespoon chopped fresh parsley
- ½ teaspoon Italian seasoning
- 1 tablespoon grated Parmesan cheese (optional)
Ingredient note: Whole-wheat flour is still carbohydrate-rich. This recipe is not carb-free, and the sugar used to help activate the yeast does not make the finished bread sugar-free.
Directions
1. Prepare the Yeast: Add warm water, instant yeast, and sugar to a large mixing bowl. Stir gently and allow it to sit for 5 minutes until slightly foamy.
2. Mix the Dough: Add whole-wheat flour, Greek yogurt, salt, and olive oil. Stir with a wooden spoon until a thick, sticky dough forms. Do not knead.
3. Allow the Dough to Rise: Cover the bowl with a clean kitchen towel. Leave it in a warm place for 60–90 minutes, or until the dough has visibly doubled in size.
4. Prepare the Garlic Topping: Mix melted butter, minced garlic, parsley, and Italian seasoning in a small bowl. Set aside.
5. Transfer to the Pan: Lightly grease a loaf pan. Transfer the risen dough into the pan and spread it evenly with a spoon.
6. Add the Topping: Brush the garlic butter mixture over the surface. Sprinkle Parmesan cheese on top if desired.
7. Preheat the Oven: Heat the oven to 375°F (190°C). Allow it to reach the correct temperature before baking.
8. Bake the Bread: Bake for 25–30 minutes, until the top is golden brown and the center is fully cooked. A toothpick inserted into the center should come out without wet dough.
9. Cool and Serve: Let the bread rest in the pan for approximately 10 minutes before transferring it to a cooling rack. Slice and serve warm.
High-Protein Tip: Serve each slice with grilled chicken, eggs, or a Greek yogurt-based dip to increase the protein content of your meal.
Nutrition Facts (Per Serving – Approximate)
Estimated for 1 of 12 slices, including garlic topping. Actual values vary by ingredients and brands.
| Nutrient | Amount |
|---|---|
| Calories | 145 kcal |
| Fats | 3.8g |
| Cholesterol | 7mg |
| Sodium | 250mg |
| Potassium | 125mg |
| Total Carbohydrates | 23g |
| Fiber | 5g |
| Net Carbs | 18g |
| Sugars | 2g |
| Protein | 6g |
| Calcium | 35mg |
Notes
- Storage: Keep leftovers airtight in the refrigerator for 3–4 days or freeze slices for up to 2 months.
- Reheating: Use an oven or toaster to restore the lightly crisp exterior.
- Allergy Information: Contains wheat, gluten, and dairy. Use suitable alternatives if you have relevant allergies.
- Flavor Boost: Add rosemary, oregano, black pepper, or a little extra parsley.
- Carbohydrate Control: Choose a smaller slice and pair it with lean protein and non-starchy vegetables.
- Diabetes Consideration: Whole-wheat flour does not make bread low-carb. Check the carbohydrate content and your individual blood-glucose response.
Frequently Asked Questions
1. Is Diabetic No-Knead Garlic Bread suitable for people with diabetes?
It may fit into a controlled-carbohydrate meal plan in a small portion, but it is not a low-carb bread.
2. Can I use almond flour instead of whole-wheat flour?
Yes, but almond flour behaves differently, so the liquid and yeast quantities will need adjustment.
3. Can I prepare the dough ahead of time?
Yes, you can refrigerate the covered dough overnight and allow it to come closer to room temperature before baking.
4. How do I know when the bread is fully baked?
The top should be golden brown, and the center should be cooked without wet or sticky dough.
5. Can I make this bread without butter?
Yes, you can use a small amount of olive oil in the garlic topping instead.
6. Is this a high-protein garlic bread?
It provides approximately 6g of protein per slice, so it is a moderate-protein option rather than a high-protein bread.
Recipe and nutrition note: The original family recipe and its exact ingredient quantities were not provided. This is a suggested version, and all nutrition figures are estimates rather than verified values.