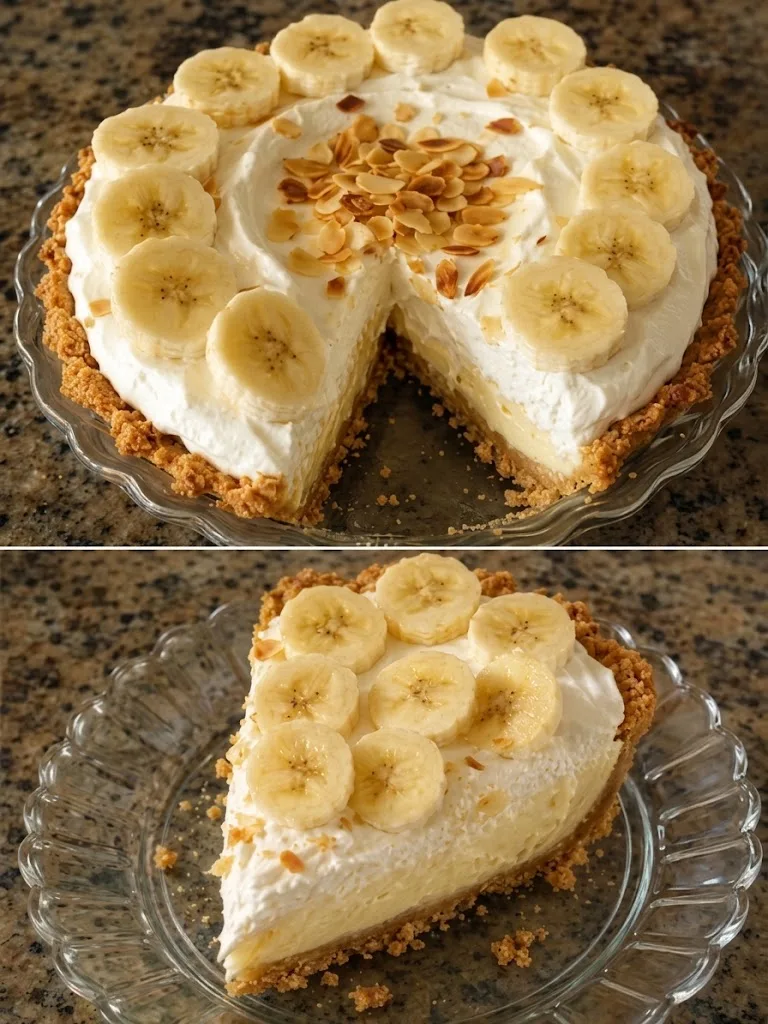
Creamy, dreamy, and packed with real banana flavor, this Vegan Banana Cream Pie is the kind of dessert that disappears quickly from the table. A crisp golden crust is layered with smooth homemade banana pudding and finished with fluffy dairy-free whipped topping. It’s sweet, comforting, and perfect for holidays, family gatherings, or whenever you want an old-fashioned cream pie made completely plant-based.
Can This Vegan Banana Cream Pie Support Weight Loss Goals?
This pie can fit into balanced eating when enjoyed in a reasonable portion. Bananas provide natural sweetness and some fiber, while using a controlled amount of added sugar and choosing lighter portions of crust and topping can help keep the overall calorie load manageable. For a more filling dessert, pair a smaller slice with a protein-rich plant-based meal or snack.
Does Vegan Banana Cream Pie Fit a High-Protein Lifestyle?
Traditional banana cream pie is mainly a carbohydrate-and-fat-based dessert, so it is not naturally high in protein. However, the filling can be made more protein-friendly by using unsweetened soy milk and adding a small amount of unflavored or vanilla vegan protein powder. The net carbs remain moderate to high because bananas and the crust contribute carbohydrates, but using less added sugar can lower the overall sugar content while keeping the creamy texture.
Why This Recipe is Special:
- Silky Banana Filling — A smooth homemade pudding creates the creamy center.
- Completely Vegan — No dairy, eggs, or gelatin are needed.
- Real Banana Flavor — Fresh bananas give the pie its classic taste and aroma.
- Creamy & Crunchy — The soft filling contrasts beautifully with the crisp crust.
- Beautiful Make-Ahead Dessert — Chilling allows the layers to set perfectly.
My Personal Experience
- The Banana FlavorFresh ripe bananas make the filling taste naturally sweet and fragrant.
Every bite has that unmistakable classic banana cream pie flavor. - The Creamy FillingThe homemade pudding becomes incredibly smooth once chilled.
It creates the soft, luxurious texture that makes this pie so satisfying. - The Crisp CrustA properly baked crust gives the creamy filling something delicious to contrast with.
It also keeps the pie from feeling overly soft. - The Final ToppingA generous layer of dairy-free whipped cream makes the pie feel extra special.
Add a few banana slices right before serving for a beautiful finish.
Perfect For:
- Family gatherings
- Holiday dessert tables
- Sunday dinners
- Birthday celebrations
- Summer parties
- Vegan dessert menus
- Potlucks
- Make-ahead desserts
Why You’ll Love This Recipe:
- Ultra Creamy — The banana pudding filling is smooth and velvety.
- Fresh Banana Flavor — Ripe bananas provide natural sweetness and authentic flavor.
- Easy to Make Ahead — The pie actually benefits from several hours of chilling.
- No Dairy or Eggs — A classic-style cream pie without animal products.
- Beautiful Presentation — Banana slices and whipped topping make every slice look inviting.
- Perfect Texture — Crisp crust, creamy filling, soft banana slices, and fluffy topping work together.
Common Mistakes to Avoid:
- Using Overripe Bananas in the Layers — Extremely soft bananas can release excess moisture and become mushy.
- Not Cooking the Filling Long Enough — The pudding needs enough heat to properly thicken.
- Adding Hot Filling to the Crust — Allow the filling to cool slightly before assembling.
- Skipping the Chill Time — The pie needs several hours to properly set.
- Adding Banana Garnish Too Early — Fresh banana slices can brown, so add them shortly before serving.
Required Equipment:
- 9-inch pie dish — Provides the ideal size for a classic pie.
- Medium saucepan — Makes the creamy banana filling evenly.
- Whisk — Prevents lumps while the pudding cooks.
- Mixing bowl — Useful for preparing the whipped topping.
- Electric mixer — Makes the dairy-free topping light and fluffy.
- Rubber spatula — Helps spread the filling and topping smoothly.
Storage Instructions:
Cover the finished pie tightly and refrigerate for up to 3 days.
For the best texture, store the pie in the refrigerator rather than at room temperature. Keep the banana garnish separate when possible and add it shortly before serving.
Freezing is not recommended for the fully assembled pie, because the creamy filling and fresh banana slices can become watery after thawing.
Recipe Details
Preparation Time: 25 minutes
Cooking Time: 15 minutes
Chilling Time: 4 hours
Total Time: 4 hours 40 minutes
Servings: 8 slices
Best Season for This Recipe: All-season
Total Calories (Per Serving): Approximately 365 calories
Short 3-Line Description
A creamy vegan banana pie layered with fresh bananas and silky homemade pudding.
A crisp crust and fluffy dairy-free topping complete every irresistible bite.
Perfect for holidays, gatherings, potlucks, or a comforting homemade dessert.
📝 Ingredients
For the Crust
- 1 ½ cups vegan graham cracker crumbs
- 5 tablespoons vegan butter, melted
- 2 tablespoons granulated sugar
- ¼ teaspoon salt
Note: Use certified vegan graham crackers if strict vegan ingredients are required.
For the Banana Cream Filling
- 2 cups unsweetened soy milk
- ½ cup granulated sugar
- ¼ cup cornstarch
- ¼ teaspoon salt
- 1 teaspoon pure vanilla extract
- 1 tablespoon vegan butter
- 3 medium ripe but firm bananas, sliced
- 1 tablespoon fresh lemon juice
For the Vegan Whipped Topping
- 1 can (13.5 oz) full-fat coconut milk, chilled overnight
- 2 tablespoons powdered sugar
- 1 teaspoon vanilla extract
Note: Use only the solid cream portion from the chilled coconut milk for the fluffiest topping.
Directions
1. Prepare the Crust
Preheat the oven to 350°F (175°C).
Combine graham cracker crumbs, melted vegan butter, sugar, and salt until the mixture resembles wet sand.
Press firmly into a 9-inch pie dish, including slightly up the sides.
Bake for 8–10 minutes, until lightly golden and fragrant.
Cool completely before adding the filling.
2. Prepare the Banana Slices
Slice the bananas into approximately ¼-inch rounds.
Toss them gently with lemon juice to help slow browning.
Set aside a few attractive slices for decorating later.
3. Start the Cream Filling
In a medium saucepan, whisk together soy milk, sugar, cornstarch, and salt while the mixture is still cold.
Whisk until the cornstarch is completely dissolved.
4. Cook Until Thick
Place the saucepan over medium heat.
Whisk constantly for approximately 6–9 minutes, especially around the bottom and corners of the pan.
The mixture should gradually become thick and glossy.
Once it reaches a pudding-like consistency and begins producing slow bubbles, cook for another 1 minute, continuing to whisk.
5. Finish the Filling
Remove the saucepan from the heat.
Whisk in the vanilla extract and vegan butter until completely smooth.
Allow the pudding to cool for approximately 10–15 minutes, stirring occasionally so a skin does not form.
High-protein tip: Unsweetened soy milk provides more protein than most almond or rice milks, making it the better choice for a protein-conscious version.
6. Assemble the Banana Layer
Arrange approximately half of the banana slices over the cooled crust.
Pour about half of the warm pudding mixture over the bananas.
Add another layer of banana slices, then cover with the remaining pudding.
Smooth the surface gently with a spatula.
7. Chill the Pie
Cover the pie with plastic wrap or a reusable airtight cover.
Refrigerate for at least 4 hours, preferably overnight.
The filling should be fully chilled and firm enough to hold its shape when sliced.
8. Make the Whipped Topping
Scoop the solid cream from the chilled coconut milk into a cold mixing bowl.
Beat with an electric mixer on medium-high speed for 2–3 minutes until fluffy.
Add powdered sugar and vanilla, then beat for another 30–60 seconds until smooth.
9. Finish the Pie
Spread or pipe the whipped coconut cream over the chilled pie.
Arrange the reserved banana slices on top immediately before serving.
For extra texture, sprinkle a few crushed graham crackers over the top.
10. Slice and Serve
Use a sharp knife warmed under hot water and dried thoroughly before each cut.
Slice into 8 portions and serve immediately.
The filling should be cool, creamy, and firm enough to hold its layers while remaining silky.
Nutrition Facts (Per Serving – Approximate)
- Calories: 365
- Fats: 18 g
- Cholesterol: 0 mg
- Sodium: 260 mg
- Potassium: 300 mg
- Total Carbohydrates: 49 g
- Fiber: 3 g
- Net Carbs: 46 g
- Sugars: 25 g
- Protein: 5 g
- Calcium: 105 mg
Nutrition values are approximate and will vary depending on the specific brands and ingredients used.
Notes
- Use firm-ripe bananas for the layers so they maintain their shape.
- Chilling the coconut milk overnight makes it much easier to separate the solid cream from the liquid.
- If your filling develops small lumps, whisk it vigorously while warm or pass it through a fine-mesh strainer before assembling.
- For extra banana flavor, mash one small banana and whisk it into the cooked pudding after removing it from the heat.
- A small amount of lemon juice helps slow browning on the exposed banana slices.
- For a nut-free version, use soy, oat, or another nut-free plant milk.
- For a higher-protein version, use unsweetened soy milk and optionally add a small amount of vanilla vegan protein powder to the cooled filling.
- Keep the pie refrigerated until serving because the creamy filling and whipped topping soften at room temperature.
Frequently Asked Questions
Can I make this banana cream pie without coconut milk?
Yes, use a prepared vegan whipped topping or another dairy-free whipping cream instead.
How long should the pie chill?
Chill it for at least 4 hours, although overnight chilling gives the cleanest slices.
Can I use oat milk instead of soy milk?
Yes, but soy milk generally provides more protein and gives the filling a slightly richer structure.
How do I keep the bananas from turning brown?
Lightly coat the sliced bananas with fresh lemon juice before layering them.
Can I make the crust without baking?
Yes, press the crust firmly into the pie dish and refrigerate it for at least 1 hour before filling.
Can I prepare this pie the day before?
Yes, preparing it the day before allows the filling to fully set and makes it an excellent make-ahead dessert.